In this lesson, we describe the basics of getting around the battlefield.
If you're unfamiliar with Java's fundamental language constructs, you may
wish to read Sun's
Language Basics tutorial.
Robot Anatomy
Your robot consists of three parts: the "tank" (body), the gun, and the radar.
Image taken from Rock 'em, sock 'em Robocode!
Each of these parts can be moved independently from each other.
Sample robot: AnatomyBot - shows each of the three parts turning independently. Incidentally, it also shows how you can print debug statements. (Click on the button with the robot's name on the right to see debug output.)
Notice that the tank moves pretty slow, the gun turret moves faster, and the radar moves faster still.
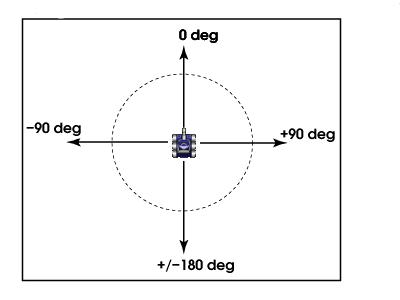
The battlefield is laid out in a cartesian plane with the origin in the lower-left corner. Degree measurements are top-wise; IOW 0/360 is at the top.
Image taken from Rock 'em, sock 'em Robocode: Round 2
You will note that this is a little different from the Unit Circle you learned in Trigonometry. This model is more akin to the vector system used in airplanes, submarines and (dare I say) tanks.
Sample robot: WallBanger - demonstrates how you can move around the battlefield and hit the walls.
Note that even though we called ahead(10000) the call returns as soon as the robot hits a wall. (See the Robocode API.)
The sample robot "Walls" will also show you how a robot can interact with the battlefield walls.
You can get your degree heading by calling getHeading(), but there are occasions where you get a Bearing, that is to say, a degree measurement from -180 to 180 that represents your offset from something (a wall, another robot, etc.)
By using the bearing, you can easily turn toward something else like so:
turnRight(event.getBearing());Which is a pretty common idiom. Note that because a bearing is a value from -180 to 180, calling turnRight() will actually make you turn left if the bearing is negative -- this is by design and it is what you want to have happen.
For your Robcode lab today, use the above information to make a robot called BearingBot that does the following.
Hint: The code for steps 2-4 will go in the onScannedRobot() method.
Match up your BearingBot against a single other opponent (not more than one - you'll see). Start by matching him up against SittingDuck and Target to test him, then try him out with Tracker, SpinBot and Crazy.
Note: Please remember to remove the onHitByBullet() method that is automatically generated for you. It's boilerplate code that's just going to get in your way right now.
Disclaimer: This is not going to be an awesome, kick-a robot; this is a "getting started" type of thing. Milk before meat. If you want to make him tougher, hack away at the code and figure it out.