In this lesson, we explore a practical application of Trigonometry. Some of this stuff gets a little heavy, but I think you guys can handle it.
The AdvancedEnemyBot homework correpsonds to this lesson.
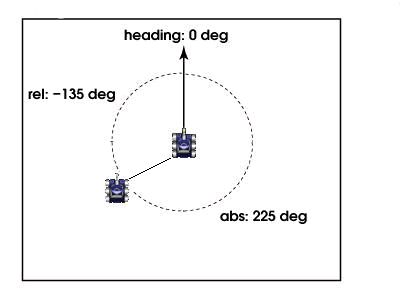
Before we begin, let's revisit the concept of bearings.
In contrast to a relative bearing, an absolute bearing is a value between 0 and +360 degrees. The following illustration shows bothe the relative and absolute bearing from one robot to another:
Absolute bearings are often useful. You guys compute an absolute bearing from a relative bearing in your AdvancedEnemyBot class to get the x,y coordinates of an enemy.
Another application of absolute bearings is to get the angle between two arbitrary points. The following function will do this for you:
// computes the absolute bearing between two points
double absoluteBearing(double x1, double y1, double x2, double y2) {
	double xo = x2-x1;
	double yo = y2-y1;
	double hyp = Point2D.distance(x1, y1, x2, y2);
	double arcSin = Math.toDegrees(Math.asin(xo / hyp));
	double bearing = 0;

	if (xo > 0 && yo > 0) { // both pos: lower-Left
		bearing = arcSin;
	} else if (xo < 0 && yo > 0) { // x neg, y pos: lower-right
		bearing = 360 + arcSin; // arcsin is negative here, actually 360 - ang
	} else if (xo > 0 && yo < 0) { // x pos, y neg: upper-left
		bearing = 180 - arcSin;
	} else if (xo < 0 && yo < 0) { // both neg: upper-right
		bearing = 180 - arcSin; // arcsin is negative here, actually 180 + ang
	}

	return bearing;
}
Note: To use the above function in your robot, you will need to import java.awt.geom.Point2D.
Sample robot: RunToCenter
a robot that moves to the center of the battlefield no matter where he starts
by getting an absolute bearing between his point and the center of the
battlefield. Note that he normalizes the absolute bearing (by calling
normalizeBearing) for more efficient turning. Match him up
against Walls to see how one takes the edges, and the other takes the
center.
Predictive Targting
Or: "Using Trigonometry to impress your friends and destroy your enemies
If you look at how RunToCenter (or most any of the previous robots) fares against Walls, they always miss. The reason this problem occurs is because it takes time for the bullet to travel. By the time the bullet gets there, Walls has already moved on.
If we wanted to be able to hit Walls (or any other robot) more often, we'd need to be able to predict where he will be in the future, but how can we do that?
Using D = RxT we can figure out how long it will take a bullet to get there.
// calculate firepower based on distance
double firePower = Math.min(500 / enemy.getDistance(), 3);
// calculate speed of bullet
double bulletSpeed = 20 - firePower * 3;
// distance = rate * time, solved for time
long time = (long)(enemy.getDistance() / bulletSpeed);
Next, we can use the AdvancedEnemyBot, which contains the methods getFutureX() and getFutureY(). To make use of the new features, we need to change our code from:
public class Shooter extends AdvancedRobot {
	private EnemyBot enemy = new EnemyBot();
to:
public class Shooter extends AdvancedRobot {
	private AdvancedEnemyBot enemy = new AdvancedEnemyBot();
Then in the onScannedRobot() method, we need to change the code from:
public void onScannedRobot(ScannedRobotEvent e) {

	// track if we have no enemy, the one we found is significantly
	// closer, or we scanned the one we've been tracking.
	if ( enemy.none() || e.getDistance() < enemy.getDistance() - 70 ||
			e.getName().equals(enemy.getName())) {

		// track him
		enemy.update(e);
	}
	...
to:
public void onScannedRobot(ScannedRobotEvent e) {

	// track if we have no enemy, the one we found is significantly
	// closer, or we scanned the one we've been tracking.
	if ( enemy.none() || e.getDistance() < enemy.getDistance() - 70 ||
			e.getName().equals(enemy.getName())) {

		// track him using the NEW update method
		enemy.update(e, this);
	}
	...
The alert student will note that it is entirely possible to use the old update method, with unfortunate results. Fair warning. One way to avoid this is to go back to the EnemyBot class and declare its update method to be final, which has the effect of making it uninheritable.
Lastly, we get the absolute bearing between our tank and the predicted location using the absoluteBearing function above. We then find the difference between the absolute bearing and the current gun heading and turn the gun, normalizing the turn to take the shortest path there.
// calculate gun turn to predicted x,y location
double futureX = enemy.getFutureX(time);
double futureY = enemy.getFutureY(time);
double absDeg = absoluteBearing(getX(), getY(), futureX, futureY);
// turn the gun to the predicted x,y location
setTurnGunRight(normalizeBearing(absDeg - getGunHeading()));
Sample robot: PredictiveShooter uses the stuff described above to anticipate where his enemy will be. Match him up against Walls and watch the magic happen.
For your Robcode lab today: