In this lesson, we describe the basics of turning and aiming your gun. Some of this stuff gets a little heavy, but I think you guys can handle it.
Your Lab 4 exercise correpsonds to this robocode lesson.
We really made some headway last week with robots like Oscillator and EnemyTracker, but they had a big shortcoming: they all had to be driving toward their enemy to shoot at it. As we recall from Lesson #2, your robot consists of three parts, all of which can move independently, and the tank part moves slowest of all.
One improvement we could make is to divorce gun movement from robot movement. This can be done easily by calling setAdjustGunForRobotTurn(true). Thereafter, you can make calls like turnGunRight() (or better yet setTurnGunRight()) to turn the gun independently. Now you can turn the gun one direction and move the tank a different direction.
We can easily turn the gun toward our opponent when we scan him by using a formula similar to the narrow beam scan from last week: we find the difference between our tank heading (getHeading()) and our gun heading (getGunHeading()) and add the bearing to the target (getBearing()), like so:
setTurnGunRight(getHeading() - getGunHeading() + e.getBearing());
Another important aspect of firing is calculating the firepower of your bullet. The documentation for the fire() method explains that you can fire a bullet in the range of 0.1 to 3.0. As you've probably already concluded, it's a good idea to fire low-strength bullets when your enemy is far away, and high-strength bullets when he's close.
You could use a series of if-else-if-else statements to determine firepower, based on whether the enemy is 100 pixels away, 200 pixels away, etc. But such constructs are a bit too rigid. After all, the range of possible firepower values falls along a continuum, not discrete blocks. A better approach is to use a formula. Here's an example:
setFire(400 / enemy.getDistance());With this formula, as the enemy distance increases, the firepower decreases. Likewise, as the enemy gets closer, the firepower gets larger. Values higher than 3 are floored to 3 so we will never fire a bullet larger than 3, but we should probably floor the value anyway (just to be on the safe side) like so:
setFire(Math.min(400 / enemy.getDistance(), 3));
Sample robot: Shooter is a robot that features independent gun movement and uses both of the above formulas to shoot at an enemy. Match him up against SittingDuck, Target, Fire, TrackFire, Corners, and maybe even Tracker and watch him spin and shoot.
As you may have noticed, Shooter has a problem: sometimes he turns his gun barrel the long way around to aim at an enemy. (Sometimes he just sits there spinning his gun barrel.) Worst case, he might turn his gun 359 degrees to hit an enemy that is 1 degree away from his gun.
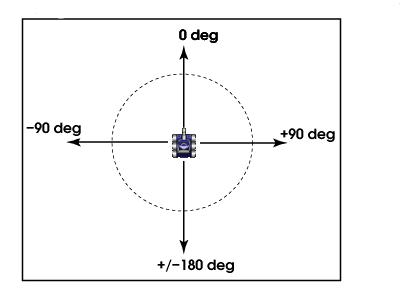
The problem is the result of getting a non-normalized bearing from the simple aiming formula above. A normalized bearing (like the kind you get in a ScannedRobotEvent) is a bearing between -180 and +180 degrees as depicted in the following illustration:
A non-normalized bearing could be smaller than -180 or larger than 180. We like to work with normalized bearings because they make for more efficient movement. To normalize a bearing, use the following function:
// normalizes a bearing to between +180 and -180
double normalizeBearing(double angle) {
	while (angle >  180) angle -= 360;
	while (angle < -180) angle += 360;
	return angle;
}
Note the use of while statements rather than if statements
to handle cases where the angle passed is extremely large or extremely small.
(A while is just like an if, except it loops.)
Sample robot: NormalizedShooter which normalizes the gun turns by using the above function.
A problem with the Shooter and NormalizedShooter robots above is that they might fire before they've turned the gun toward the target. Even after you normalize the bearing, you could still fire prematurely.
To avoid premature shooting, call the getGunTurnRemaining() method to see how far away your gun is from the target and don't fire until you're close.
Additionally, you cannot fire if the gun is "hot" from the last shot and calling fire() (or setFire()) will just waste a turn. We can test if the gun is cool by calling getGunHeat().
The following code snippet tests for both of these:
// if the gun is cool and we're pointed at the target, shoot!
if (getGunHeat() == 0 && Math.abs(getGunTurnRemaining()) < 10)
	setFire(firePower);
(Feel free to test with values other than 10.)
Sample robot: EfficientShooter who uses the normalizeBearing function for more efficient gun turning and avoids premature shooting by using the above if statement.
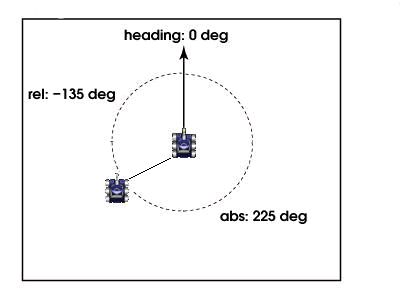
In contrast to a relative bearing, an absolute bearing is a value between 0 and +360 degrees. The following illustration shows bothe the relative and absolute bearing from one robot to another:
Absolute bearings are often useful. You guys computed an absolute bearing from a relative bearing in your AdvancedEnemyBot class to get the x,y coordinates of an enemy.
Another application of absolute bearings is to get the angle between two arbitrary points. The following function will do this for you:
// computes the absolute bearing between two points
double absoluteBearing(double x1, double y1, double x2, double y2) {
	double xo = x2-x1;
	double yo = y2-y1;
	double hyp = Point2D.distance(x1, y1, x2, y2);
	double arcSin = Math.toDegrees(Math.asin(xo / hyp));
	double bearing = 0;

	if (xo > 0 && yo > 0) { // both pos: lower-Left
		bearing = arcSin;
	} else if (xo < 0 && yo > 0) { // x neg, y pos: lower-right
		bearing = 360 + arcSin; // arcsin is negative here, actuall 360 - ang
	} else if (xo > 0 && yo < 0) { // x pos, y neg: upper-left
		bearing = 180 - arcSin;
	} else if (xo < 0 && yo < 0) { // both neg: upper-right
		bearing = 180 - arcSin; // arcsin is negative here, actually 180 + ang
	}

	return bearing;
}
Sample robot: RunToCenter
a robot that moves to the center of the battlefield no matter where he starts
by getting an absolute bearing between his point and the center of the
battlefield. Note that he normalizes the absolute bearing (by calling
normalizeBearing) for more efficient turning. Match him up
against Walls to see how one takes the edges, and the other takes the
center.
Predictive Targting
Or: "Using Trigonometry to impress your friends and destroy your enemies
One last problem remains: If you look at how any of the previous robots fares against Walls, they always miss. The reason this problem occurs is because it takes time for the bullet to travel. By the time the bullet gets there, Walls has already moved on.
If we wanted to be able to hit Walls (or any other robot) more often, we'd need to be able to predict where he will be in the future, but how can we do that?
Using D = RxT we can figure out how long it will take a bullet to get there.
// calculate firepower based on distance
double firePower = Math.min(500 / enemy.getDistance(), 3);
// calculate speed of bullet
double bulletSpeed = 20 - firePower * 3;
// distance = rate * time, solved for time
long time = (long)(enemy.getDistance() / bulletSpeed);
Next, we can use the AdvancedEnemyBot class you guys all wrote, which contains the methods getFutureX() and getFutureY(). To make use of the new features, we need to change our code from:
public class Shooter extends AdvancedRobot {
	private EnemyBot enemy = new EnemyBot();
to:
public class Shooter extends AdvancedRobot {
	private AdvancedEnemyBot enemy = new AdvancedEnemyBot();
Then in the onScannedRobot() method, we need to change the code from:
public void onScannedRobot(ScannedRobotEvent e) {

	// track if we have no enemy, the one we found is significantly
	// closer, or we scanned the one we've been tracking.
	if ( enemy.none() || e.getDistance() < enemy.getDistance() - 70 ||
			e.getName().equals(enemy.getName())) {

		// track him
		enemy.update(e);
	}
	...
to:
public void onScannedRobot(ScannedRobotEvent e) {

	// track if we have no enemy, the one we found is significantly
	// closer, or we scanned the one we've been tracking.
	if ( enemy.none() || e.getDistance() < enemy.getDistance() - 70 ||
			e.getName().equals(enemy.getName())) {

		// track him using the NEW update method
		enemy.update(e, this);
	}
	...
The alert student will note that it is entirely possible to use the old update method, with unfortunate results. Fair warning.
Lastly, we get the absolute bearing between our tank and the predicted location using the absoluteBearing function above. We then find the difference between the absolute bearing and the current gun heading and turn the gun, normalizing the turn to take the shortest path there.
// calculate gun turn to predicted x,y location
double futureX = enemy.getFutureX(time);
double futureY = enemy.getFutureY(time);
double absDeg = absoluteBearing(getX(), getY(), futureX, futureY);
// turn the gun to the predicted x,y location
setTurnGunRight(normalizeBearing(absDeg - getGunHeading()));
Sample robot: PredictiveShooter uses the stuff described above to anticipate where his enemy will be. Match him up against Walls and watch the magic happen.