In this lesson, we describe the basics of turning and aiming your gun.
We really made some headway last week with robots like EnemyTracker and EnemyOrCloser, but they had a big shortcoming: they all had to be driving toward their enemy to shoot at it. As we recall from Battlefield Basics, your robot consists of three parts, all of which can move independently, and the tank part moves slowest of all.
One improvement we could make is to divorce gun movement from robot movement. This can be done easily by calling setAdjustGunForRobotTurn(true). Thereafter, you can make calls like turnGunRight() (or better yet setTurnGunRight()) to turn the gun independently. Now you can turn the gun one direction and move the tank a different direction.
We can easily turn the gun toward our opponent when we scan him by using a formula similar to the narrow beam scan: we find the difference between our tank heading (getHeading()) and our gun heading (getGunHeading()) and add the bearing to the target (getBearing()), like so:
setTurnGunRight(getHeading() - getGunHeading() + e.getBearing());
Another important aspect of firing is calculating the firepower of your bullet. The documentation for the fire() method explains that you can fire a bullet in the range of 0.1 to 3.0. As you've probably already concluded, it's a good idea to fire low-strength bullets when your enemy is far away, and high-strength bullets when he's close.
You could use a series of if-else-if-else statements to determine firepower, based on whether the enemy is 100 pixels away, 200 pixels away, etc. But such constructs are a bit too rigid. After all, the range of possible firepower values falls along a continuum, not discrete blocks. A better approach is to use a formula. Here's an example:
setFire(400 / enemy.getDistance());With this formula, as the enemy distance increases, the firepower decreases. Likewise, as the enemy gets closer, the firepower gets larger. Values higher than 3 are floored to 3 so we will never fire a bullet larger than 3, but we should probably floor the value anyway (just to be on the safe side) like so:
setFire(Math.min(400 / enemy.getDistance(), 3));
(Feel free to experiment with a different value instead of 400.)
Sample robot: Shooter is a robot that features independent gun movement and uses both of the above formulas to shoot at an enemy. Match him up against SittingDuck, Target, Fire, TrackFire, Corners, and maybe even Tracker and watch him spin and shoot.
As you may have noticed, Shooter has a problem: sometimes he turns his gun
barrel the long way around to aim at an enemy. (Sometimes he just sits there
spinning his gun barrel.) Worst case, he might turn his gun 359 degrees to hit
an enemy that is 1 degree away from his gun. (This situation might arise, say,
when the tank's heading is 359 degrees, the gun's heading is 1 degree, and the
bearing to the enemy is +1 degree.)
Normalized Bearings
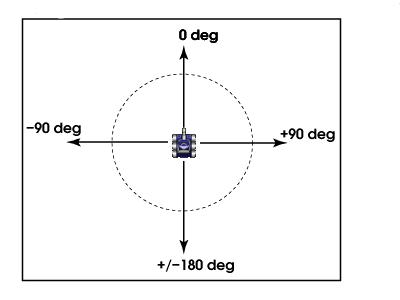
The problem is the result of getting a non-normalized bearing from the simple aiming formula above. A normalized bearing (like the kind you get in a ScannedRobotEvent) is a bearing between -180 and +180 degrees as depicted in the following illustration:
A non-normalized bearing could be smaller than -180 or larger than +180. We like to work with normalized bearings because they make for more efficient movement. To normalize a bearing, use the following function:
// normalizes a bearing to between +180 and -180
double normalizeBearing(double angle) {
	while (angle >  180) angle -= 360;
	while (angle < -180) angle += 360;
	return angle;
}
Note the use of while statements rather than if statements
to handle cases where the angle passed is extremely large or extremely small.
(A while is just like an if, except it loops.)
You can call this in your robot like so:
//  calculate gun turn toward enemy
double turn = getHeading() - getGunHeading() + e.getBearing();
// normalize the turn to take the shortest path there
setTurnGunRight(normalizeBearing(turn));
Sample robot: NormalizedShooter which normalizes the gun turns by using the above function.
A problem with the Shooter and NormalizedShooter robots above is that they might fire before they've turned the gun toward the target. Even after you normalize the bearing, you could still fire prematurely.
To avoid premature shooting, call the getGunTurnRemaining() method to see how far away your gun is from the target and don't fire until you're close.
Additionally, you cannot fire if the gun is "hot" from the last shot and calling fire() (or setFire()) will just waste a turn. We can test if the gun is cool by calling getGunHeat().
The following code snippet tests for both of these:
// if the gun is cool and we're pointed at the target, shoot!
if (getGunHeat() == 0 && Math.abs(getGunTurnRemaining()) < 10)
	setFire(firePower);
(Feel free to test with values other than 10.)
Sample robot: EfficientShooter who uses the normalizeBearing function for more efficient gun turning and avoids premature shooting by using the above if statement.
For your Robcode homework today, follow the above notes to add some better firing code to your bot. You should do the following: